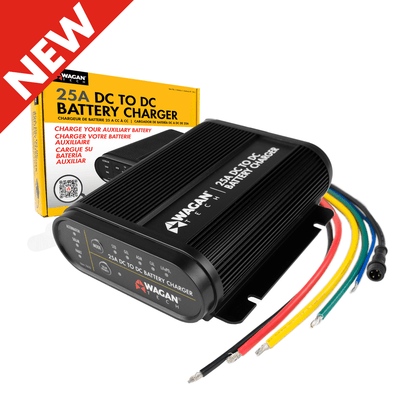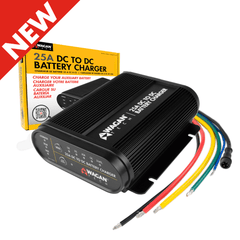
25A DC to DC Battery Charger
Purposefully designed to accurately and safely charge auxiliary batteries, the Wagan Tech Dual-Input DC to DC Charger series ensures your batteries are kept at optimum levels that will enhance performance and extend their lifespan. Our chargers can be used with standard and smart alternator vehicles and is perfect for use with solar system setups.
Intelligent 3-Stage Charging
Our Intelligent 3-stage charging uses a high-speed microcontroller and a proprietary charging algorithm to deliver a sophisticated 3 stage charging process.
The first stage, bulk charge (constant current), charges the battery fast while the second stage, absorption (constant voltage), ensures the battery is thoroughly charged.
The third stage, float, monitors and keeps the battery at a safe voltage allowing it to be maintained and ready for use.
Works with Most Battery Types
Our DC to DC Charger works with:
- SLA (Sealed Lead Acid)
- Flooded Lead-acid
- Gel
- AGM (Absorbed Glass Mat)
- Calcium
- LiFePO4 Lithium Iron Phosphate batteries*
*LiFePo4 batteries must have a Battery Management System (BMS) in place.
Solar Panel Charging (MPPT)
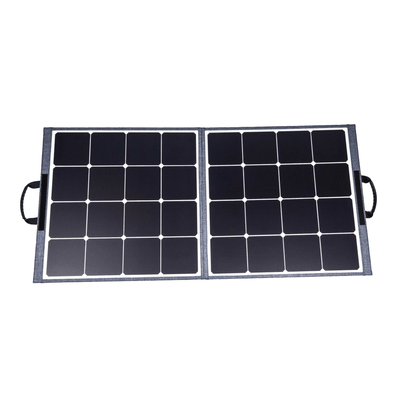
Our DC to DC Charger utilizes sophisticated MPPT (Maximum Power Point Tracking) solar regulator technology. MPPT maximizes the power generated from your solar panels to the auxiliary battery. The static efficiency of the MPPT algorithm is >97%, and the dynamic efficiency is >95%. This DC to DC Battery Charger can be used with solar panels up to 375W combined in 12V systems and 750W combined in 24V systems.
Straight-Forward Installation
- Color-coded & labeled wires makes it easy to identify routing location
- Instruction Manual is detailed and indicates all necessary installation procedures
- Compact size makes finding an installation site easy
- Heat, vibration, water, and dust protected for limitless installs
- Butt-splice connectors are included
- Mounting plate is integrated into unit's design making installation a breeze
Integrated Safety Features
Spark-Free Protection
The 25A DC to DC Battery Charger will not start charging the battery (no output) unless the load is securely connected (except the LiFePO4 mode which allows 0 volt start); this prevents the leads from sparking due to accidental short circuit making the charger safer to use around batteries.
Reverse Connection Protection
Reverse Connection or "reverse polarity" on input and output terminals will not damage the internal circuitry. Our Charger detects reverse connection conditions and indicates to the user whether input or output connection is reversed.
Over and Under Voltage Protection
The charger will automatically shut down if there is an over voltage or under voltage condition detected to protect the user and the charger.
Over Temperature Protection
The charger will lower its output current if the temperature of the unit begins to exceed its pre-set threshold.
Completes your Power Eco-system
For systems with Solar Panels, Power Inverters, and auxiliary batteries, the DC to DC Charger completes the power eco-system by providing a way to connect, power, and recharge everything.
Internally Protected Components
Our DC to DC Chargers feature a clear thick layer of resin (known as "potting") that seals the components from water and dust, dampens vibration and physical shock, keeps heat out, and helps with electrical performance.
Quick List of Features:
- Intelligent Charging
- Works with Standard, Gel, AGM, LiFePo4, and other battery types
- Automatic Safety Features Built-in
- MPPT Solar Charge Controller
- Works with new Smart Alternator equipped vehicles
- For systems with and without Solar Panels
Specs
Input
- Maximum Input Current: 25 Amps
- DC Input range: 9V-32 VDC
- Solar Input Trigger: 12V
- Max Solar Input (V): 32VDC
- Max Solar Input (W): 375W (12V), 750W (24V)
- Wire Leads Length: 13" (approx.)
- Input Fuse: 40A (not included)
Output
- Output Voltage (nominal): 6V/12V
- Maximum Output Current: 25A
- Ambient Load: <10mA
- Back Drain: <15mA
- Max Output Power 300W
- Output Fuse: 40A (not included)
Compatible Battery Types
- Standard Flooded Lead-Acid
- SLA (Sealed Lead-Acid)
- Calcium
- AGM (Absorbed Glass Mat)
- LiFePo4 with BMS (Lithium Iron Phosphate)
- Gel
- Supports Batteries from 50Ah to 500Ah
Features
- Potted (Performance Coated) PCB
- Remote Digital Display Interface (#5605) Capable (not included)
- Mounting Panel built-in
- 12V/24V Auto-Detection
- Solar Priority Function
- Tinned Copper Wires
Unit Specifications
- MPPT Solar Charge Controller
- 3-Stage Battery Charging
- Net weight: 1.4 lbs.
- Dimensions (in.): 5.7L x 5.1W x 1.7H"
- Operating Temperature Range: -4°F to 176°F (-20°C to 80°C)
- IP Rating: IP66 (Dust-proof and Waterproof)
- Certifications: CE, BC
Protections (automatic)
- Overcharge
- Over Heat
- Over/Under Voltage
- Reverse Polarity
Warranty: 2 years
 WARNING: This product can expose you to chemicals including DEHP, which is known to the State of California to cause cancer and birth defects or other reproductive harm. For more information, go to www.P65Warnings.ca.gov.
Installation
MOUNTING
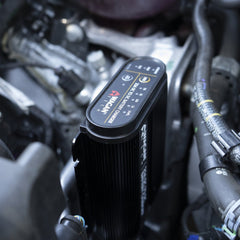
The DC to DC 25A charger is designed for a variety of installation environments, including chassis rail, engine bay, interior cabin, etc. The unit has been designed to work in vibrating, wet, dusty and muddy environments. The battery charger is compact and can withstand temperatures of up to 176°F, so it can be installed in the engine bay. However, to get better charging efficiency, you should try to mount it away from high-temperature parts of the engine bay. Installation should be made near the auxiliary battery and the proper charging mode should be selected for the battery chemistry.
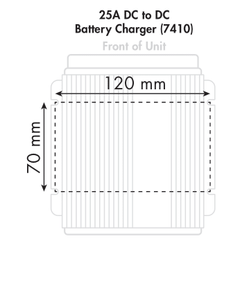
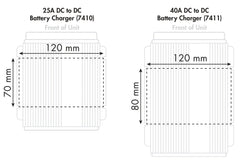
The mounting plate that is affixed to the battery charger measures:
WIRING
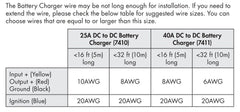
The attached battery charger wires may be not long enough for installation; if you need to extend the wires, please check the table below for the appropriate wire sizes. You can choose wires that are equal to or larger than the recommended size.
It is very important that the connection wires are firmly connected. It is recommended to use the included Butt Splice Connectors or properly solder the joint. After completion, heat shrinkable tubing must be used for insulation to prevent short circuits and water intrusion.
- Disconnect the negative battery cable (Earth) from the vehicle’s starting battery or disconnect power to the trailer. Note: To prevent the loss of vehicle electronic memories, radio presets & security codes, it is recommended that an “Electrical System Memory Protector” be used.
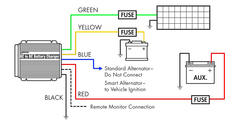
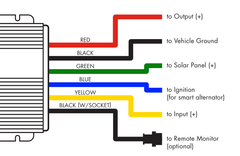
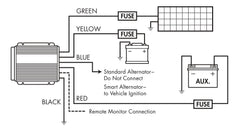
- Connect the Auxiliary Battery positive (+) terminal to the Output Cable (RED color) from 25A DC-DC Charger. Fit a 40A fuse to the cable as close as possible to the Auxiliary Battery positive (+) terminal.
- Connect the Auxiliary Battery negative (-) terminal to the 25A DC-DC Charger Common Ground cable (BLACK color). Alternatively connect both Auxiliary Battery negative (-) terminals and 25A DC-DC Charger Common Ground cable to vehicle chassis ground.
- Connect the Starter Battery positive (+) terminal to the 25A DC-DC Charger Alternator Input cable (YELLOW color). Fit a 40A fuse to the cable as close as possible to the Starter Battery positive (+) terminal.
- If your vehicle has fixed voltage or temperature compensating alternator (standard alternators) installed, leave the Ignition Override cable (BLUE color) open. If your vehicle has smart (variable voltage) alternator installed, the Ignition Override cable must be connected to the vehicle’s ignition. The 25A DC-DC Charger Charger will only operate when the vehicle’s ignition is turned on.
- When 12V solar panels are present, connect the solar panel positive terminal (+) to the 25A DC-DC Charger Solar Input cable (GREEN color). Fit a 40A fuse to the cable as close as possible to the Solar Panel positive (+) terminal. Then, connect the Solar Panel negative (-) terminal to the 25A DC-DC Charger Common Ground cable (BLACK color). Alternatively connect both Solar Panel negative (-) terminals and IDC45 Common Ground cable to vehicle chassis ground.
- Restore the negative connection of the battery. Now test the system to ensure it is working properly.
Videos
Description
25A DC to DC Battery Charger
Purposefully designed to accurately and safely charge auxiliary batteries, the Wagan Tech Dual-Input DC to DC Charger series ensures your batteries are kept at optimum levels that will enhance performance and extend their lifespan. Our chargers can be used with standard and smart alternator vehicles and is perfect for use with solar system setups.
Intelligent 3-Stage Charging
Our Intelligent 3-stage charging uses a high-speed microcontroller and a proprietary charging algorithm to deliver a sophisticated 3 stage charging process.
The first stage, bulk charge (constant current), charges the battery fast while the second stage, absorption (constant voltage), ensures the battery is thoroughly charged.
The third stage, float, monitors and keeps the battery at a safe voltage allowing it to be maintained and ready for use.
Works with Most Battery Types
Our DC to DC Charger works with:
- SLA (Sealed Lead Acid)
- Flooded Lead-acid
- Gel
- AGM (Absorbed Glass Mat)
- Calcium
- LiFePO4 Lithium Iron Phosphate batteries*
*LiFePo4 batteries must have a Battery Management System (BMS) in place.
Solar Panel Charging (MPPT)
Our DC to DC Charger utilizes sophisticated MPPT (Maximum Power Point Tracking) solar regulator technology. MPPT maximizes the power generated from your solar panels to the auxiliary battery. The static efficiency of the MPPT algorithm is >97%, and the dynamic efficiency is >95%. This DC to DC Battery Charger can be used with solar panels up to 375W combined in 12V systems and 750W combined in 24V systems.
Straight-Forward Installation
- Color-coded & labeled wires makes it easy to identify routing location
- Instruction Manual is detailed and indicates all necessary installation procedures
- Compact size makes finding an installation site easy
- Heat, vibration, water, and dust protected for limitless installs
- Butt-splice connectors are included
- Mounting plate is integrated into unit's design making installation a breeze
Integrated Safety Features
Spark-Free Protection
The 25A DC to DC Battery Charger will not start charging the battery (no output) unless the load is securely connected (except the LiFePO4 mode which allows 0 volt start); this prevents the leads from sparking due to accidental short circuit making the charger safer to use around batteries.
Reverse Connection Protection
Reverse Connection or "reverse polarity" on input and output terminals will not damage the internal circuitry. Our Charger detects reverse connection conditions and indicates to the user whether input or output connection is reversed.
Over and Under Voltage Protection
The charger will automatically shut down if there is an over voltage or under voltage condition detected to protect the user and the charger.
Over Temperature Protection
The charger will lower its output current if the temperature of the unit begins to exceed its pre-set threshold.
Completes your Power Eco-system
For systems with Solar Panels, Power Inverters, and auxiliary batteries, the DC to DC Charger completes the power eco-system by providing a way to connect, power, and recharge everything.
Internally Protected Components
Our DC to DC Chargers feature a clear thick layer of resin (known as "potting") that seals the components from water and dust, dampens vibration and physical shock, keeps heat out, and helps with electrical performance.
Quick List of Features:
- Intelligent Charging
- Works with Standard, Gel, AGM, LiFePo4, and other battery types
- Automatic Safety Features Built-in
- MPPT Solar Charge Controller
- Works with new Smart Alternator equipped vehicles
- For systems with and without Solar Panels
Specs
Input
- Maximum Input Current: 25 Amps
- DC Input range: 9V-32 VDC
- Solar Input Trigger: 12V
- Max Solar Input (V): 32VDC
- Max Solar Input (W): 375W (12V), 750W (24V)
- Wire Leads Length: 13" (approx.)
- Input Fuse: 40A (not included)
Output
- Output Voltage (nominal): 6V/12V
- Maximum Output Current: 25A
- Ambient Load: <10mA
- Back Drain: <15mA
- Max Output Power 300W
- Output Fuse: 40A (not included)
Compatible Battery Types
- Standard Flooded Lead-Acid
- SLA (Sealed Lead-Acid)
- Calcium
- AGM (Absorbed Glass Mat)
- LiFePo4 with BMS (Lithium Iron Phosphate)
- Gel
- Supports Batteries from 50Ah to 500Ah
Features
- Potted (Performance Coated) PCB
- Remote Digital Display Interface (#5605) Capable (not included)
- Mounting Panel built-in
- 12V/24V Auto-Detection
- Solar Priority Function
- Tinned Copper Wires
Unit Specifications
- MPPT Solar Charge Controller
- 3-Stage Battery Charging
- Net weight: 1.4 lbs.
- Dimensions (in.): 5.7L x 5.1W x 1.7H"
- Operating Temperature Range: -4°F to 176°F (-20°C to 80°C)
- IP Rating: IP66 (Dust-proof and Waterproof)
- Certifications: CE, BC
Protections (automatic)
- Overcharge
- Over Heat
- Over/Under Voltage
- Reverse Polarity
Warranty: 2 years
 WARNING: This product can expose you to chemicals including DEHP, which is known to the State of California to cause cancer and birth defects or other reproductive harm. For more information, go to www.P65Warnings.ca.gov.
Installation
MOUNTING
The DC to DC 25A charger is designed for a variety of installation environments, including chassis rail, engine bay, interior cabin, etc. The unit has been designed to work in vibrating, wet, dusty and muddy environments. The battery charger is compact and can withstand temperatures of up to 176°F, so it can be installed in the engine bay. However, to get better charging efficiency, you should try to mount it away from high-temperature parts of the engine bay. Installation should be made near the auxiliary battery and the proper charging mode should be selected for the battery chemistry.
The mounting plate that is affixed to the battery charger measures:
WIRING
The attached battery charger wires may be not long enough for installation; if you need to extend the wires, please check the table below for the appropriate wire sizes. You can choose wires that are equal to or larger than the recommended size.
It is very important that the connection wires are firmly connected. It is recommended to use the included Butt Splice Connectors or properly solder the joint. After completion, heat shrinkable tubing must be used for insulation to prevent short circuits and water intrusion.
- Disconnect the negative battery cable (Earth) from the vehicle’s starting battery or disconnect power to the trailer. Note: To prevent the loss of vehicle electronic memories, radio presets & security codes, it is recommended that an “Electrical System Memory Protector” be used.
- Connect the Auxiliary Battery positive (+) terminal to the Output Cable (RED color) from 25A DC-DC Charger. Fit a 40A fuse to the cable as close as possible to the Auxiliary Battery positive (+) terminal.
- Connect the Auxiliary Battery negative (-) terminal to the 25A DC-DC Charger Common Ground cable (BLACK color). Alternatively connect both Auxiliary Battery negative (-) terminals and 25A DC-DC Charger Common Ground cable to vehicle chassis ground.
- Connect the Starter Battery positive (+) terminal to the 25A DC-DC Charger Alternator Input cable (YELLOW color). Fit a 40A fuse to the cable as close as possible to the Starter Battery positive (+) terminal.
- If your vehicle has fixed voltage or temperature compensating alternator (standard alternators) installed, leave the Ignition Override cable (BLUE color) open. If your vehicle has smart (variable voltage) alternator installed, the Ignition Override cable must be connected to the vehicle’s ignition. The 25A DC-DC Charger Charger will only operate when the vehicle’s ignition is turned on.
- When 12V solar panels are present, connect the solar panel positive terminal (+) to the 25A DC-DC Charger Solar Input cable (GREEN color). Fit a 40A fuse to the cable as close as possible to the Solar Panel positive (+) terminal. Then, connect the Solar Panel negative (-) terminal to the 25A DC-DC Charger Common Ground cable (BLACK color). Alternatively connect both Solar Panel negative (-) terminals and IDC45 Common Ground cable to vehicle chassis ground.
- Restore the negative connection of the battery. Now test the system to ensure it is working properly.
Videos
Reviews
 Magnadyne WF-B2T | Twist-On Roof Mount Wireless Repeater Enclosure Antenna Base
Choose a Color


